Course Overview

Golf World Top 100 Golf Resorts UK & Ireland

Heacham Manor Golf Course might be young, but it is growing up fast. On the undulating ‘links’ style front nine the landscaping has settled in and the shrubs have thrived, while the trees of the parkland back nine are just how nature intended.

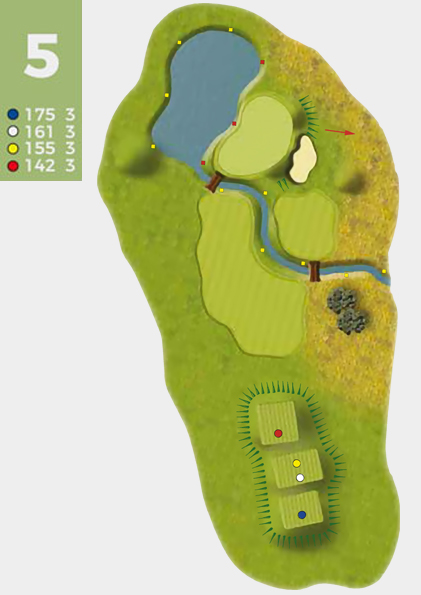
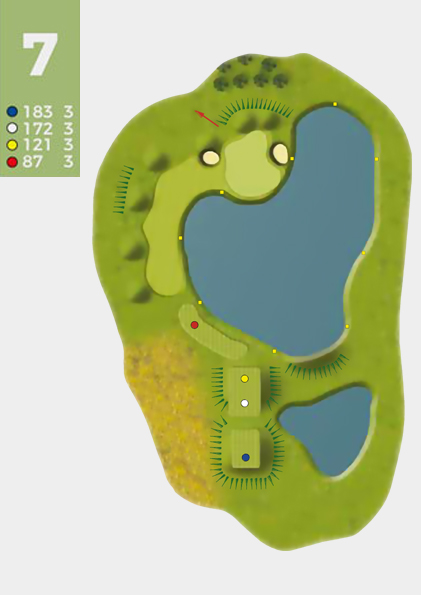
A wide variety of native trees and shrubs have been planted to enhance the difficulty of the holes and complement the 'links' feel to the course. There are also four lakes, the largest of which is the backdrop for the 'signature hole' the par-three, seventh.

Norfolk is a beautiful county, and our golf club boasts a beautiful coastal course. After your round enjoy our contemporary golf facilities located within the Pavilion, that include a well-stocked golf shop, sports bar and restaurant and 1st floor terrace bar with sweeping views of the course.

A distinct character, born from its beautiful Norfolk coast location

The course is designed for players of all standards and has four sets of tee positions. The championship tee plays a course of 6786 yards while junior tees are around, 4500 yards.

Download The Scorecard

Book a Tee Time

  • Hole 1 Overview

    Pro's Tip

    There is a large spine on the left side of the green, so it is advisable to approach this green from the right half of the fairway.


  • Hole 2 Overview

    Pro's Tip

    Keep the tee shot to the left or over the large poplar trees. You will need to follow this with an accurate 2nd that needs to be as close to the left hand approach bunker as possible, for an open shot to the green.


  • Hole 3 Overview

    Pro's Tip

    From the white and blue tees you have the choice to go right of the river or over it, but from the yellow tee big hitters will most definitely want to go for the green.

  • Hole 4 Overview

    Pro's Tip

    Stay to the right on tee shot to avoid the dyke which runs beside the first 3/4 of the whole. The 2nd shot must lay up short of the right hand lake for an easy shot to green.

  • Hole 5 Overview

    Pro's Tip

    A small creek meanders from the left to right which will gather the not so good tee shot. However the real hazard on this hole is the hidden lake at the back left waiting for the long pulled tee shot.

  • Hole 6 Overview

    Pro's Tip

    A slight dog leg right to left with fairway bunkers all the way, it is important to stay on the fairway if you intend to get up in two shots, so an accurate tee shot is required.

  • Hole 7 Overview

    Pro's Tip

    The par 3 - 7th is one of Heacham's signature holes. The Club selection here is vital; as the last 100 yeards is carry over water with bunkers left and right.

  • Hole 8 Overview

    Pro's Tip

    The three fairway bunkers on the right will automatically force you to go left, however beware of the hidden lake on the left waiting for that stray tee shot. The elevated green slopes from back to front and requires a perfect 2nd shot.

  • Hole 9 Overview

    Pro's Tip

    The drive here needs to be as tight as possible, because of the hidden lake on the left. On the approach it is advisable to be short rather than long because of the dyke at the back of the green.

  • Hole 10 Overview

    Pro's Tip

    Your drive must go just to the left of the two right hand bunkers to avoid the lake on the left waiting for the pulled tee shot. It will require a well struck iron to find the very large 10th green.

  • Hole 11 Overview

    Pro's Tip

    Your tee shot must head towards the pump house, then, depending on the wind direction, you have the option to lay up short of the lake or go for the long carry over to the well protected green.

  • Hole 12 Overview

    Pro's Tip

    Your drive must be aimed towards the white house in the distance as you need to favour the left side of the fairway if you intend to attack a tricky back right pin placing with your 2nd shot.

  • Hole 13 Overview

    Pro's Tip

    Aim your tee shot to go between the eyebrow bunkers and you will find the middle of the fairway. Once in position club selection is now important as the 2nd shot can be deceiving to a well protected green.

  • Hole 14 Overview

    Pro's Tip

    Your drive must flirt with the right hand bunker as everything will fall to the left side of the fairway, although the left side is where you want to be to get a shot at the green.

  • Hole 15 Overview

    Pro's Tip

    Club selection is important as this hole looks longer than it really plays. The subtle contours on the green can make putting very challenging.

  • Hole 16 Overview

    Pro's Tip

    Your drive must find the fairway avoiding Ray's Creek on the left of the hole, at the same time not flying through the fairway into the Heacham River. Make your seccond shot count, as the undulating green is just over the Heacham River.

  • Hole 17 Overview

    Pro's Tip

    Club selection is important as it is easy to over club finding the out of bounds ditch at the back of the green.

  • Hole 18 Overview

    Pro's Tip

    A well positioned tee shot short of the Heacham river is needed. Staying to the right on your 2nd shot then allows you the chance to pitch your 3rd shot to the difficult green, with the back left corner sloping down towards Ray's Creek.